Cadd Solis Pump Cheat Sheet - The needleless blue connector cap will be referred to as “blue cap” in the instructions. Attach a luer lock syringe containing the medication to the end of the line. The screensaver allows the pump to conserve battery power when not in an. When 3/4 of the fl. • the pump will then require you to attach the cassette or the bag, if this has not yet been done (to attach the disposable see the section titled. Press stop/start to start the pump. Tilt the cassette to approx 70° angle and fi ll. Before leaving the pharmacy, the pump was programmed by your pharmacist per your healthcare provider’s orders and was verified. Follow these instructions with every infusion.
When 3/4 of the fl. The needleless blue connector cap will be referred to as “blue cap” in the instructions. The screensaver allows the pump to conserve battery power when not in an. Attach a luer lock syringe containing the medication to the end of the line. Tilt the cassette to approx 70° angle and fi ll. Follow these instructions with every infusion. • the pump will then require you to attach the cassette or the bag, if this has not yet been done (to attach the disposable see the section titled. Before leaving the pharmacy, the pump was programmed by your pharmacist per your healthcare provider’s orders and was verified. Press stop/start to start the pump.
• the pump will then require you to attach the cassette or the bag, if this has not yet been done (to attach the disposable see the section titled. The screensaver allows the pump to conserve battery power when not in an. When 3/4 of the fl. The needleless blue connector cap will be referred to as “blue cap” in the instructions. Tilt the cassette to approx 70° angle and fi ll. Press stop/start to start the pump. Attach a luer lock syringe containing the medication to the end of the line. Follow these instructions with every infusion. Before leaving the pharmacy, the pump was programmed by your pharmacist per your healthcare provider’s orders and was verified.

CADD Legacy Quick Reference
Tilt the cassette to approx 70° angle and fi ll. Follow these instructions with every infusion. Attach a luer lock syringe containing the medication to the end of the line. Press stop/start to start the pump. When 3/4 of the fl.
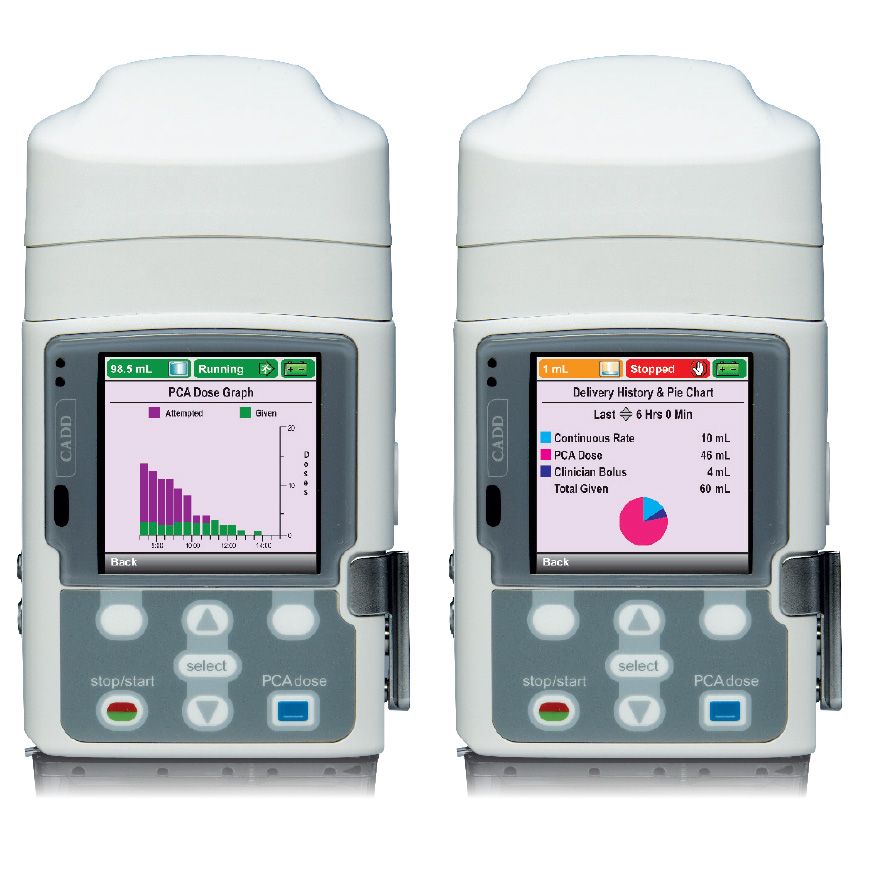
CADDSolis VIP™ Ambulatory Home Infusion System ICU Medical
• the pump will then require you to attach the cassette or the bag, if this has not yet been done (to attach the disposable see the section titled. Tilt the cassette to approx 70° angle and fi ll. When 3/4 of the fl. Press stop/start to start the pump. The needleless blue connector cap will be referred to as.
HOW TO SET UP THE CADDSOLIS PUMP YouTube
Follow these instructions with every infusion. Tilt the cassette to approx 70° angle and fi ll. The needleless blue connector cap will be referred to as “blue cap” in the instructions. Attach a luer lock syringe containing the medication to the end of the line. When 3/4 of the fl.
CADD Solis Ambulatory Infusion Pump USME
• the pump will then require you to attach the cassette or the bag, if this has not yet been done (to attach the disposable see the section titled. Follow these instructions with every infusion. Tilt the cassette to approx 70° angle and fi ll. Press stop/start to start the pump. The needleless blue connector cap will be referred to.

SMITHS MEDICAL CADDSOLIS 2131 OPERATOR'S MANUAL Pdf Download ManualsLib
Press stop/start to start the pump. • the pump will then require you to attach the cassette or the bag, if this has not yet been done (to attach the disposable see the section titled. Follow these instructions with every infusion. The screensaver allows the pump to conserve battery power when not in an. Before leaving the pharmacy, the pump.
Screenshot_20210203 CADD(R)Sol is VIP Ambulatory Infusion System
Before leaving the pharmacy, the pump was programmed by your pharmacist per your healthcare provider’s orders and was verified. When 3/4 of the fl. Tilt the cassette to approx 70° angle and fi ll. Press stop/start to start the pump. The screensaver allows the pump to conserve battery power when not in an.
CADDSolis™ Infusion System PCA Infusion Pumps ICU Medical
Press stop/start to start the pump. When 3/4 of the fl. Follow these instructions with every infusion. Before leaving the pharmacy, the pump was programmed by your pharmacist per your healthcare provider’s orders and was verified. The screensaver allows the pump to conserve battery power when not in an.

CADDSolis VIP™ Ambulatory Home Infusion System ICU Medical
Before leaving the pharmacy, the pump was programmed by your pharmacist per your healthcare provider’s orders and was verified. Tilt the cassette to approx 70° angle and fi ll. • the pump will then require you to attach the cassette or the bag, if this has not yet been done (to attach the disposable see the section titled. When 3/4.

CADD Solis Pump Tour
• the pump will then require you to attach the cassette or the bag, if this has not yet been done (to attach the disposable see the section titled. Before leaving the pharmacy, the pump was programmed by your pharmacist per your healthcare provider’s orders and was verified. Attach a luer lock syringe containing the medication to the end of.

CADD Solis Pump Tour
Press stop/start to start the pump. When 3/4 of the fl. Before leaving the pharmacy, the pump was programmed by your pharmacist per your healthcare provider’s orders and was verified. • the pump will then require you to attach the cassette or the bag, if this has not yet been done (to attach the disposable see the section titled. Follow.
• The Pump Will Then Require You To Attach The Cassette Or The Bag, If This Has Not Yet Been Done (To Attach The Disposable See The Section Titled.
Press stop/start to start the pump. Before leaving the pharmacy, the pump was programmed by your pharmacist per your healthcare provider’s orders and was verified. Attach a luer lock syringe containing the medication to the end of the line. The screensaver allows the pump to conserve battery power when not in an.
Follow These Instructions With Every Infusion.
The needleless blue connector cap will be referred to as “blue cap” in the instructions. Tilt the cassette to approx 70° angle and fi ll. When 3/4 of the fl.